Friday, November 18, 2011

Turkey Pumpkin

Now is the best time to get pumpkins! The grocery stores still have plenty, and they are selling em super cheap! I got mine for 19 cents a pound, it totalled less than a dollar! Awesome!!

Wanting to make a craft for thanksgiving and try to capture a moment in time I decided to go ahead and do a handprint turkey. I used mine, Aubrey's and Daddys hand prints for the feathers. Just trace your hands on colored paper. We did 5 or 6 of each color of each hand. Then you tape them to the pumpkin. I used tape so the pumpkin won't mold from pricking it. I did smallest hands in front and biggest hands in back. Turned out totally sweet! Makes for a wonderful centerpiece and at the end of the season I can take the handprints and put them in the scrapbook. Then when Aubrey gets older I can say "here is how big you hand was when you were only tiny." Have fun with it and enjoy the holidays.
Gobble Gobble

Thursday, November 10, 2011

Turkey Day Jumper

Thanksgiving is on its way! I am so looking forward to it this year. I was hoping I could host Thanksgiving feast at my house (since it is the first thanksgiving of many here), but my mother-in-law was pretty insistent on it being there. Oh well! There is always next year. I am making the turkey though, so if anyone knows a to die for recipe, let me know, I have never made a turkey before.

In celebration of the season and what thanksgiving means to me, I made Aubrey a corduroy jumper.  I then created an applique and used my sewing machine only. I was pretty impressed with myself. So much so, that I am contemplating a tutorial on how to do it. However, that would entail making another jumper since I didn't photograph anything while doing this one. Next time, I will make the turkey smaller and have several ruffles at the bottom. Here is the pattern I used. All I did differently, was make my own applique on the front. I also only did two ruffles because of how big the turkey is and I did a top stitch around the hem.

Apparently it is too warm a day though for the turtleneck and jumper. As soon as Aubrey came inside, she started peeling her clothes off saying "hot, hot, off, pees" Speaking of talking, Aubrey is saying alot these days. My favorite thing she says is "Hans thup!" which is Hands up but with the cutest little lisp ever!! She can also open and close doors now as well as climb anything and everything. My how they grow too fast.

Thursday, October 27, 2011

Pumpkin Spice Hot Cocoa

I love fall. Really, I do! The weather becomes bearable, the leaves turn colors. It is acceptable to lay around in comfy sweaters with a hot mug of cocoa. However, awesome all of those things are, I have one thing I love BEST about fall: Pumpkins! I love me some pumpkin everything. You can make almost anything with pumpkins; soup, bread, pie, ravioli, and my favorite, Pumpkin Cocoa! Yum! Coffee-Mate has this liquid creamer that is Pumpkin Spice, absolutely amazing stuff. So I decided I would whip up some pumpkin spice hot cocoa just for you (and mostly me)! This is super creamy, definitely chocolaty and  pumpkin-y to boot!


Pumpkin Spice Hot Cocoa
1/3 cup unsweetened cocoa powder
1/2 cup sugar (I sometimes do part brown and part white)
1/3 cup water
3 1/2 cups milk
1/2 tsp vanilla
1/4 cup - 1/2 cup Pumpkin Spice Creamer (I add 1/4 and slowly add more if I taste it needs more)

Bring your water to a simmer, it should be steamy but not rolling. Add your sugar, cocoa, and a pinch of salt. Turn the heat off the water and add your milk. Stir it constantly to make sure it doesn't scorch.Add your creamer and vanilla. Stir! Divide into 4 mugs, top with cool whip and dust with cinnamon. It is delicious.

Aubrey and E in their "Bug and Hisses" shirts made by BE Cute Boutique! These girls are seriously the sweetest girls ever! E loved holding Aubs hand, and Aubs kept saying E's name. And she says it with her tongue out, and that makes it hilarious!

I hope everyone is enjoying their fall! Eat lots of pumpkin and enjoy your family.

Andie

Tuesday, October 25, 2011

An explanation and Halloween Treats

I believe I owe my readers (all 11 of you) an explanation. I haven't posted in 2 months, I apologize. My life has been super hectic. I am a full-time student (15 hours this semester) and filling my free time with much gardening.

So onto something crafty, you hope? Well, nothing spectacular but I did make a couple Boo Bags for the neighbors. You can't really tell here, but in the bag on the left, those are Halloween (orange) oreos that I drew jack-o-lantern faces on with melted chocolate. And the bag on the right is "Worms in dirt" which is crushed oreos (no icing) and gummy worms. They were all too easy, but the boy next door is only 2 and he is simply precious. There is an orange car, and then a few boxes of stickers too.

We also made a pumpkin for our front porch!  I had a lot of fun doing it, and I got the idea to put flowers in it from our local nursery. I originally planned doing an M and leaves (which is on the back, ha!) but it was looking a little to crafty and not very crisp. Honestly, if you decide to make one, put a heavy rock in the bottom because it keeps blowing over and the flowers get squashed each time. Live and learn!
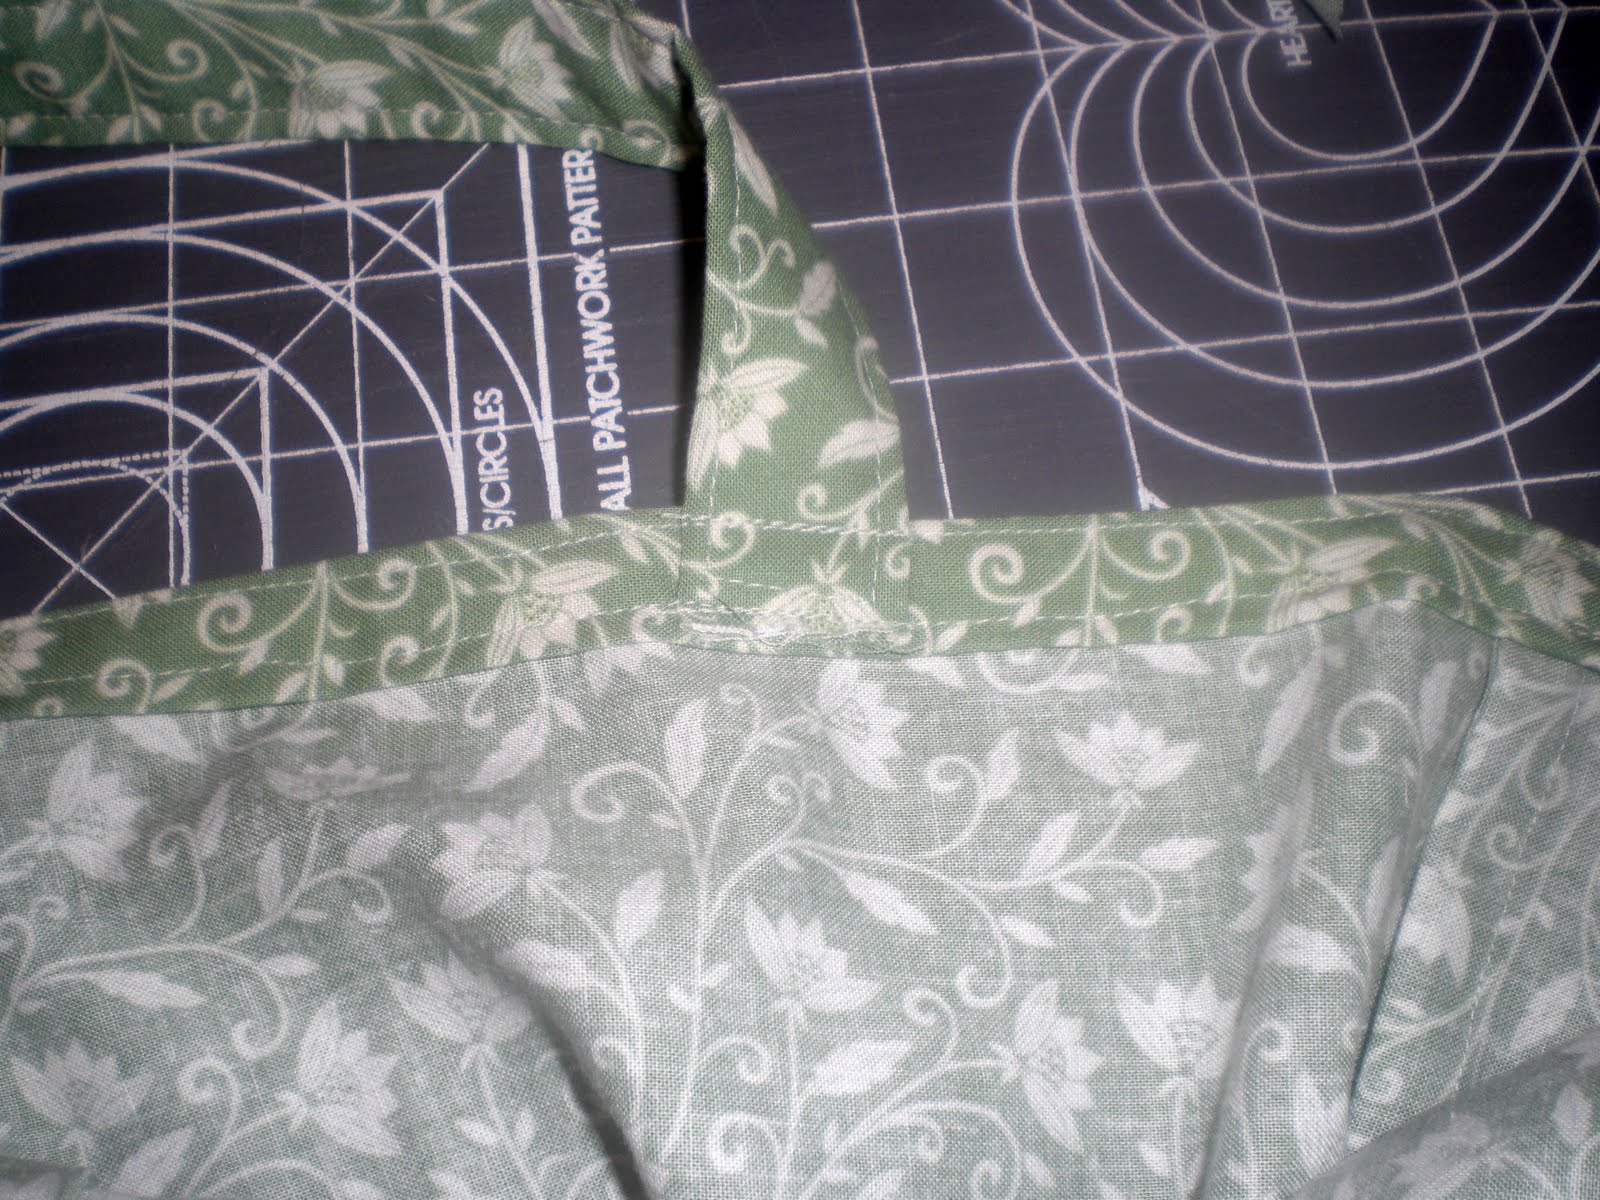
My dear sister is having another boy tomorrow! I am so excited to meet him! Christopher Quinton, but we'll call him Quinton since my step-mom and husband are both Chris'. After her first boy was 6 months, she gave everything to a friend in need, and now that she's due, the whole fam is trying to play catch up, again :) I have been making outfits and today I put this boppy slipcover together. While it turned out well, I learned alot! First off, whewn the directions say to get an 18 inch zipper, do it! ha! Mine is only 12 inch and it was like trying to stuff my size 10 booty into my pals size 6 jeans! Lol! Also, one side is 1 inch longer than the other, so take the time to measure before you start cutting. Finally don't close your 2 yr olds bedroom door hoping the fact that she can't open the door will hold her in. Actually, she now knows how to open the door. Note to self: Pick up tall baby gates.
Her is the back, I thought a soft flannel would be good for winter months to help keep him warm while he's nursing. Here is the tutorial I used. Does anyone else LOVE Grosgrain? I know I do! Only thing I would tweak is to give myself a little more seam allowance. She says top trace the pillow and add an inch, Next time I'll do 1/4 inch more because I didn't have alot of room for my seam allowance and it was super tight.
Finally here is my first zipper ever! I have been fond of buttons but now that I see how easy zippers can be, I'll start working them in! Like I said, don't skimp on zipper size. It was very difficult to get the pillow in because of the curvature. I am thinking next up I will be making some uber cute ones for the holidays. A big fat santa boppy cover maybe, or some reindeer???

Finally, I have decided to try out the CG method. It is a method of caring for curly hair.Here is my hair now, super frizzy, undefined, dull, and dry.

I am using Giovanni Smooth as Silk Conditioner and Direct Leave In. I hope to post every other week on the progress, but my calendar is often pretty crowded these days.

I am looking forward to the cool weather (stil in the mid 80s but Thursday is supposed to be soup weather finally). Hope to enjoy some pumpkin and other festive flavors!

Andie

Friday, August 26, 2011

Some Like It Hot

Ladies, It is hot! I mean really hot here... This week, the temps are supposed to float around 107-110. You can't go outside except to get in the car and dash into where ever it is you decided couldn't hold off any longer. Also, everything is dying. By everything I mean my garden :) Watermelons are heat loving plants, however, mine couldn't take the heat. My softball sized watermelon finally cracked from this weather.
So what is there to do when you are cooped up in a house? I know what you are thinking, get out! Go somewhere! Unfortunately, our belts are pretty tight right now. Chris just got transferred to a really far store which is costing us 4 times in gas of what we were before. Also, we are anticipating a really high electric bill. So what do we do all day?
Lots of coloring...
This was a fun idea! My pal, B, had a party for her now 2 year old, E, and they had a pool and filled it with balls. The kids LOVED it!

The most important thing I think we do, is lots of reading and doing puzzles. I try to limit the television because it worries me how Aubrey zombies out then the TV is on. We have been doing this animal puzzle for a week now. Aubrey can already put all the pieces in the right spot on her own! I don't even have to tell her what it is. She also "reads" a book to me. It is a Boydton book "Opposites" Very sweet book. Aubrey likes to do the sound effects I normally do when I'm reading it. Like one day and night I make a yawn and a snoring noise. Finally, Aubrey is trying to sing her ABC's. She tells me "Mommy C,D!" And then we sing. She mostly hums but at the very end she says "MEEEEE!" in a really high pitched squeal of a sing song voice. It's super cute. 

Her we are with her cousin, Sarina. Playdates are a life saver honestly. It entertains her while I can have some adult time too. I need more playdates!!

What do you do to keep your sanity when you are stuck inside with the little one(s)?? I need more ideas :)

Tuesday, August 23, 2011

Sleepless Session #2


Once again I found myself an alert insomniac. I laid down for bed at 10 and finally got up at 1 because I was still awake. My sewing machine was hollering my name. Aubrey had a birthday party to attend today, so I made her a new top to wear. (Not like she doesn't have loads of clothes already) So I based the dress off one she had that is now too small.
I love this top, Aubrey wore it a bunch because it was sleeveless and made of cool fabric to help beat the heat. I was sad when I realized it was too tight around the chest. So I made one! Yay!

My sewing skills were not up to par however at 2am this morning. So, I will have to fix some areas like the straps. For example, what was I thinking with the binding?? Duh... it should have been one piece, not three. I will do better, I promise! My favorite part about it was the flower. I made it with a sleeve I cut off a long sleeve shirt. Upcycling is AWESOME! I will leave you with some of my amateur photos of Aubrey in her dress. Lucky you!


Sunday, August 21, 2011

Yo Gabba Gabba Cake

My bff B's daughter is turning 2 this week! She ordered a cake for her family party and I was going to make 46 cupcakes for her play date party. Yesterday evening, I was expecting the cake to be dropped off with me to take to the party today. Come 9 pm I was getting worried. Finally, at 11, I talked to the cake lady and turns out B told her Tuesday! Sooooo, that meant E wasn't going to have a cake. So I stayed up all night baking and then all morning decorating. I learned ALOT. And for my first stacked cake I'd say it turned out very well! Here are some pictures!


I made two 13x9 white cakes and then cut them into 9x9 and 4x4 squares. I iced them with white icing that I colored with gel food coloring. Aubrey watches YGG often so I knew the characters pretty well! As for Plex and DJ Lance Rock, well it was a small cake. Hope you had an eventful weekend as well!


Friday, August 19, 2011

Carrot Muffins and Orange Icing

So, I was playing with my food this morning! Shame on me...

For breakfast, I do not usually make pancakes, waffles, or bacon and eggs. Most often my family has oatmeal. Actually, almost every morning we have oatmeal. Occasionally we will do some scrambled egg whites or yogurt with fresh fruit, but most often, we eat oatmeal. I don't do this because I enjoy making my family suffer, I do it because oatmeal is healthy, full of fiber, and you can easily change the flavor by altering the ingredients you add. For example, one morning you can have apples and cinnamon, and the next you can have strawberries and cream. But I digress. 

This morning, I realized I have an excess of carrots. They are on sale for 3.50 for a 5 pound bag and I am hoping we can finish this bag and pick up another before the sale ends on Tuesday. Ha! So instead of oatmeal with shredded carrots (bleh!) I made carrot muffins. And since I had an orange that was threatening to disintegrate on the counter, we made orange icing. These are low-fat and actually very tasty! Want proof? 
That was her second one! She kept calling it cake. Cute!

Carrot Muffins with Orange Icing
Makes 12 muffins


2 Tbls of butter at room temperature
3/4 cup sugar
1 tsp vanilla
1 large egg
2 egg whites
4 carrots, shredded (I used the cheese grater to shred my own)
1 Tbls orange rind, grated
1/4 skim milk
1/2 cup all purpose flour
1/2 cup whole wheat flour
1/2 cup rolled oats (see I got some oats in there!)
2 Tbls ground flaxseed (optional: I add for extra fiber)
1 1/4 tsp baking powder
1 tsp ground cinnamon
3/4 tsp baking soda
1/2 tsp ground nutmeg
1/4 tsp salt

Icing
1/2 cup powdered sugar
1 Tbls orange juice

  • Preheat your oven to 350 F. Line a 12 cup muffin pan with liners.
  • In a large mixing bowl, cream your butter and sugar together using an electric mixer until smooth. Add vanilla and mix. Then add your eggs and mix well. Stir in carrots, orange rind, an milk.
  • In a seperate bowl, combine your white and wheat flour, oats, flax seed, baking powder, cinnamon, nutmeg, baking soda, and salt.
  • Por your flour mix into the egg mix and beat until just mixed, about 10-20 seconds. Do not over mix.
  • Using a 1/3 cup measuring cup, pour batter into all 12 liners.
  • Bake for 20-25 minutes or until a toothpick put in the center comes out clean. Mine took 23 minutes. Set out on a cooling rack.
How to prepare the icing:
  • Stir together your powdered sugar and orange juice. If you need to thicken it, add more sugar. To thin it out more, add more juice but only a a little at a time. 
  • Then dab on top of your muffins and smooth out with a knife. 
To freeze:
  • These muffins freeze very well! After icing them, put them on a baking sheet and slide into the freezer.\
  • After several hours, or the muffins are frozen solid, put them into a plastic freezer bag and back into the freezer. They will store well for a couple months. However, mine never last that long :)
  • To thaw: Set out your muffins the night before or just microwave them for a minute on high.
This is a good recipe to get your kiddos eating vegetables without the fit! Also, your spouse if they don't like em!  They are low fat and taste great! Kind of tastes orangey but sweet like a carrot. And the icing has a  great tang. Hope your family enjoys these as much as my family does.


Wednesday, August 17, 2011

Grilled Eggplant Pizza

Lately, I have been cooking vegetarian every other day. It is cheaper, alot cheaper. That and healthier! So this week at Sprouts, eggplant was on sale! 88 cents.. Woo hoo! My hubby, Chris, is super picky and announced his hatred for eggplant, mushrooms, and all things green about two years ago after I decided to gourmet cook regularly with more veggies than meat. So, he wasn't thrilled when I told him we were having eggplant pizza for dinner! HA!

No but really this pizza was amazing! Chris went back for thirds and is looking forward to leftovers for lunch tomorrow. His words "This is eggplant? like the purple vegetable, eggplant?!?" Yeah boy! So imma share my amazing life-altering (or at least taste-altering) recipe... Lucky you!

Grilled Eggplant Pizza
1 small eggplant
1 pound Whole Wheat Pizza Dough
cornmeal
Pizza Sauce
About 15 fresh basil leaves chopped or 2 Tbls dried
1 clove garlic, minced
1 cup crumbled feta

  • If you are going to make your pizza dough from scratch (which I totally recommend) then you will need to make that early.
  • An hour before you start cooking, slice the eggplant into 1/2 inch slices. Salt the slices on both sides and put on a cooling rack with a paper towel underneath. You want all the juice to drip off, it makes the eggplant bitter if you skip this step.
  • Okay, so now heat your grill to medium high heat. Grill the eggplant for 3 minutes on each side. Let it cool enough to handle, then cut into slices.
  • Turn down the heat on the grill to medium.
  • Roll out your dough to a pizza sized circle, about 14 inches diameter. Sprinkle cornmeal on the bottom.
  • Put your pizza bottom crust up for 4 minutes. Flip the pizza carefully. Spoon your sauce on the pizza, top it with the eggplant, basil, minced garlic, and feta cheese. 
  • Leave it on the grill for 8-10 minutes. Remove from the grill, cut with a pizza cutter, and serve with an awesome salad! Enjoy!
It really is yummy! You will have to try it to know for yourself, because the blog doesn't transfer tastes or smells. When I called customer service and asked, they seemed a little confused... Ha!

So what is one vegetable you hate? Because I promise I can come up with something awesome and delicious!!


Tuesday, August 16, 2011

New Blinds!

I am a very cheap frugal shopper. The first place I head in ANY store is the clearance rack. So I went to Lowe's and was just getting some dowel rods, but I had to check the clearance tables around the store. In the blinds section, I stopped at the mis-cut table and saw a huge blind(s?) (70 inches kinda huge). I called Chris immediately and told him to get out the measuring tape and see how big the kitchen window is! Turns out, this one was PERFECT! literally. Sooooo I took it to the register, and it rang in at $85 bucks or something and then it was discounted to $15.. WHAT?!? I called three people, my husband, my mom, and my bff B an had to tell them all about the amazing deal I just got.

Well, the next morning I decided I would get the new blinds out and install them myself... haha! Yeah, that didn't happen... I could hardly lift them, let alone stand on the countertops and screw em into the window box. So finally, today, my dearly beloved husband put them in. It took the two of us and lots of cursing (no worries the infant was in bed dreaming innocent dreams completely missing the vulgarity happening in the kitchen). Needless to say, we felt very accomplished! So after doing the dishes and cleaning and organizing a little more than usual, I give you the end result!
Ta-da! The blinds have been a need for a while and I wish we had done them sooner. Especially after the neighbor informed us that they can see into our home day and night... *cough cough*... Also, the sun shines in this window from about 8am until noon and it really heats up the kitchen. Literally, I refuse to do any dishes before one. Now that will have to change I guess.

But honestly, it is such a rewarding feeling when you do something difficult and challenging and you completely ace it! So fun! Our next home improvement will be either the guest bath, the dining room, the front hall, or the craft room.... hmmmmm... It all needs help.

What is one home improvement you have done that you would have done sooner?


Monday, August 15, 2011

Sewing for Momma: Upcycled Denim skirt

Last night I woke up at 2 am... This would usually not be horrible because normally I'd go to the fridge, get a light snack and go back to bed. However, I had to get blood work done today so I had to fast after midnight. My tummy was rumbling and I couldn't go back to sleep so I decided to sew some to get my mind off it til I was tired enough to sleep.

I will say, it is amazing what one can come up with at the wee hours of the morning. In my stash, I have had this brightly colored striped fabric. I paid $2.16 a yard for it at Hancocks because it was already marked down and then it was 40% off! AWESOME!

So at 2 am I started trying to think... What could I make with this? Not like I don't have enough half finished projects... But I wanted to try something new. I began thinking upcycled. Thats when I remembered some jeans I cut off this summer. I only cut them off because it was a million degrees and I was in a house without ac for 7 hours... Lame! But enough chit chat! Here is what I made at 2 am this morning:

TADA!! I really like it! However, it is more raw then I would like. I am going to make another but more put together and I promise a tutorial when I do. Unfortunately, I can't be cutting all my jeans up so I will have to go thrift some.

So tell me: What do you do when you are up and can't sleep?

Saturday, August 13, 2011

Vegetarian "Chili" and Confetti Cornbread

I know it is hot here in Texas, but today the weather was nice... Not necessarily chili weather but it has been a long time since we've had chili weather. Missing my favorite dish I decided it was chili night!

In my family, we are trying to limit our meat intake. To do this, we load up on veggies and a heavy carb to keep us full for the night. On these nights, I try to use up all the vegetables in my fridge. So I came up with this "chili" inspired dinner.

For the chili:
1 or 2 Tbsp Olive Oil
1 large onion, diced
1 green bell pepper diced or jalapeno if you prefer more heat in your chili
3 celery stalks diced
1 large sweet potato peeled and diced
1 can kidney beans, drained
1 can diced tomatoes
2 Tbsp fresh oregano or 1 Tbsp dried.
1/2 tsp garlic powder
1/2 tsp cumin
2 tsp chili powder
1/4 tsp ground red pepper
salt and pepper to taste

  • Saute the onion, pepper, and celery till tender.
  • Add the sweet potato, kidney beans, and tomatoes plus 1 1/2 cans of water.
  • Stir in all the spices. Cover and simmer for 30 minutes.
  • Uncover and let simmer another 10 minutes until 1/2 the water is evaporated.
  • Garnish with a slice of Confetti Cornbread, cheese, and green onions. Also, sour cream would be great!
For the cornbread:
1/2 cup all purpose flour
1/2 cup whole wheat flour
1 cup cornmeal
2 Tbsp brown sugar
1 Tbsp baking powder
1/2 tsp salt
1/4 tsp cumin
1/2 tsp ground fennel
1/2 tsp chili powder
1 cup milk
2 large eggs
1/2 stick butter, melted
1/2 cup frozen corn
1 cup shredded cheddar cheese

  •  Preheat oven to 425 F and grease a 9 in cake round.

  • Combine the flour, cornmeal, baking powder, sugar, and spices.
  • In a separate bowl, combine milk, eggs, and butter.
  • Pour liquid into flour mix and stir until moist. Will be a thick lumpy batter.
  • Stir in corn and cheese. (Green chiles would be good here too! I just didn't have any on hand)
  •  Pour batter into 9 in round and put into oven. Bake 20 minutes or until toothpick in the center comes out clean.
This was what we made this evening for dinner! Let me know if you try it. I'd love to hear your thoughts about it. My husband inhales food so therefore has no real opinion on taste and flavor.

Thursday, August 11, 2011

Reusable Tote Tutorial

Today I was reading an article about the swirling gyre of plastic in the Pacific Ocean. Apparently it is 6 miles across and killing the marine life. This got me to thinking about how many plastic bags I use every time I head to the grocery store. While I have a few reusable bags I purchased, I rarely make sure that I have them with me when I go to the store and end up having to use plastic bags anyways. However, my main waste is on produce bags. I get like 20 every trip because we consume lots of fruits, veggies, and bulk items. To see my options I went to GreenSangha.org There it says to bring reusable bags with you, so I googled "Reusable Produce Bag Pattern" Daisy Jane's fabric produce bag pattern came up. It took a fat quarter or an 18x18 inch square of fabric. I just used some leftover fabric I had from a dress I made Aubrey.


My favorite things about the produce bag is that it is light, sturdy and it rolls up easily.
After I made the produce bag, I cut out the green fabric thinking I was going to make two more produce bags, but was distracted. When I came back to the project I noticed that the fabric was the perfect size for a shopping tote. So I put together a little tutorial on how to make your own grocery tote.

Here is what you need:
2 18x17 inch rectangles of main fabric
2 18x4 inch rectangles of main fabric
1 8x4 inch rectangle of coordinating fabric

Step One: Making the Pocket
  • When cutting the fabric for the pocket, I let one one long side be the selvage so I didn't have to sew that side because the edge was already finished.
  • Fold over the remaining three edges 1/4 inch under and press.

  • Pin the pocket to the main fabric where you want it. Be sure to keep it away from the exact edge because you will be sewing the edges.  I put mine in the upper center.
  •  Sew down the three sides making sure to leave the selvage side open.
Step Two: Making the Handles
  • Fold your 18x4 inch pieces in half long ways and press.
  • Fold both long sides to the middle of the strip. Press well.

  • Fold in half again and press.
  •  Sew around all four edges.
Step Three: Making the Tote
  • Lay both your main fabrics wrong sides together. You are going to create a French seam. This is to help maintain the life of your bag! So if you put a gallon of milk in there, it hopefully won't rip out. If you don't know how to do a French seam go HERE
  • Next go around the top of the bag, and fold under 1/4 inch and press. Then fold under again 1/4 inch and press.
  • After you do your french seam, your bag should be inside out. Sew along the bottom of the bag (make sure the pocket opening is up and not down or else you will be hitting your head at the end!)
  •  Go ahead and pull your fabric to make the bottom corners into triangles. It can take some maneuvering to get it just right. I also like to make sure my bottom seam and my side seam are lined up. To do that, you use your fingers inside the bag to feel that the bottom seam is directly on top of the bottom seam.
  •  Now, mark 2 inches from the tip of the triangle on both sides and sew across your mark. I like to sew twice on the same line for good measures.
  • Trim off the top of the triangle about 1/2 and inch from the seam you just sewed. This is to decrease bulk.
Step Four: Attaching The Handles
  • Pin each handle to the tote. I put each end 4 inches from the sides. Pin well because it will move on you.
  • Now topstitch twice around the "hem" you created in Step 3. Make sure to back stitch across the handles. I apologize for the slopping sewing. Aubrey likes to help... Ususlly she just pulls the fabric and pushes the reverse button over and over again. I got to this step right as she woke up from her nap so there was no stopping me. 

  • Flip your bag right side out and shout "Ta-Da!"
Step 5: Using your Bag

  • Make a coordinating produce bag! 
  • Put them in your glove box.
  • Any store you go in, bring your bags and insist on reusable. If people stop using plastic bags, the stores will quit buying them. If the stores no longer buy them, then the plastic bag makers will stop making them. 
I hope this is very helpful! Now go be a dot on this little planet and reuse your bags, care about the environment, and love your neighbors. 


P.S. I know I said I had  a skirt coming your way, but I ran out of thread and I don't have any coupons... So I have to wait either for thread to be on sale or until I get a coupon... :) So I hope this works for the moment! Also, I had to write this 3 different times because my computer kept shutting off so it may be missing a step. I read through and it looked fine, but let me know if you notice anything missing or wrong! Thanks